Saturday 8 December 2012

Remembering Aussie Legends...Robbo's last model

Following on from my last post, here's more info about Machines built by our own Aussie Tattoo Legends.

Dan Robinson Snr is known to many across Australia & the world as either Danny or simply "Robbo".

Over the years, he designed & built a number of Frames, in a variety of different styles & materials.
The early 90's saw Dan's very last Frame style, which were all sand cast in what's known as "Gunmetal".
Dan liked his Machines to have some weight, so this choice of Gunmetal helped with that.

The casting for these Frames was done by a small Foundry located just down the road from his then Studio, Highline Tattooing, which is located near St. Kilda Junction.
This same small Foundry was also casting those "Logie" Frames from my previous post.

Dan would do all the work himself on these rough castings, the clean up, drilling, taping & their polishing.
Once all the stages were completed, the Frames were sent off to be chrome plated.
As with all of Dan's Frames, this was specifically designed & built as a Thin Armature Machine.


I recently had the opportunity to grab some photos of one of these old Robbo "Gunmetal" Frames.
This particular Frame belongs to Graeme Iles & my Thanks goes to him for allowing this opportunity.

In my personal opinion, this particular style Robbo Frame, would have to be his most iconic.

Commonly known as the Robbo "Gunmetal" Frame.
Designed & built by Dan (Robbo) Robinson Snr, early 90's

Inside view of the Robbo "Gunmetal" Frame.
Designed & built by Dan (Robbo) Robinson Snr, early 90's

Sunday 28 October 2012

Remembering Aussie Legends...a tale of two Frames

It saddens me that there's a whole lot of young Aussie Tattoo Artists who know all about Sailor Jerry...
...but know next to nothing about their very own "Aussie Tattoo Legends"...not even their names..!

Granted, it's not easy finding out about those Old Aussie's Legends, that's mostly because their names, stories, knowledge & history were always "passed on" verbally to the younger ones...
It seems that somewhere along the line, the names of our own Legends stopped being mentioned?

I post the following in an effort to get some of those old Aussie Tattoo Legends recognised & remembered.
My hope is that these names will once again grace the lips of the current generation of Aussie Tattoo Artists, without being followed by the question..."who's that??"


A blast from the past:
Had a very good friend & Tattoo Artist come to visit & to also pick up their finished Machines.
They'd brought along a few old cast Frames belonging to Dan Robinson Snr, for me to check out.

Talk about a "blast from the past"...I instantly recognised both of these Frames!!
  • Dan Robinson Snr designed Frame for a Single & Twin Coil that he affectionately called the "Logie".
  • Kevin Coppin designed Frame missing it's "Swing-Gate" component to clamp the Tube in place.
So I took the opportunity to grab some photos of these old Frames & now I "pass on" their info...


Dan (Robbo) Robinson Snr "Logie" Frame:
When I worked for Dan at Highline Tattooing in St. Kilda, he was getting his Frame designs cast at a small Foundry just down the road from the Studio.
Dan would get me to pick up the raw castings & I'd drop them off to him at his home.
So that "Logie" Frame was one of those designs I was picking up & dropping off to him.

Raw casting of  the "Logie" Frame to suit either a Single Coil or Twin Coil.
Designed & built by Dan (Robbo) Robinson Snr, early 90's
Inside view of  the "Logie" Frame to suit either a Single Coil  or Twin Coil.
Designed & built by Dan (Robbo) Robinson Snr, early 90's
Another view of  the "Logie" Frame to suit either a Single Coil or Twin Coil.
Designed & built by Dan (Robbo) Robinson Snr, early 90's


Kevin Coppin "Swing-Gate" Frame:
This particular Kevin Coppin Frame has a very different story attached to it.
Back in the late 80's, Kevin gave me an old mould he had for doing this particular Frame design.
Apparently there was a problem with it & as I used to be a Jeweller, he figured I'd be able to sort it out.
So the first thing I did was to get one cast in Brass, that way I could see where & what the problem was??
I did managed to get it all filed, but unfortunately life got in the way & this project got pushed aside.
In the 90's I gave this Frame to Dan, as he had a few ideas & wanted to have a play with it.
So 20 + years later, the very same Frame shows up at my place, exactly as I'd given it to Dan..!

It's kind of funny how "Life" does things like that...

"Swing-Gate" style Frame. (missing it's Swing-Gate component)
Design by Kevin Coppin
Inside view of this "Swing-Gate" style Frame. (missing it's Swing-Gate component)
Design by Kevin Coppin
Another view of this "Swing-Gate" style Frame. (missing it's Swing-Gate component)
Design by Kevin Coppin

Sunday 21 October 2012

Machine Building2...out they go!

I'd mentioned in a previous Blog post that I still had to build some "Aussie Old School" Machines.
Part of this included a 3.5mm Audio Socket & required a Bracket to suit these Jolly Frames.

Well here's those last two Machines, now all run-in & finished, ready to go off to their new homes.

Left to Right:
Thin Armature Liner with Rubber Block to suit a Straight Shaft Needle Bar...pure "Old School".
Heavy Armature Magnum with the standard Pin to suit Grommets or Nipples & Eyed Needle Bars.


Sunday 7 October 2012

Machine Building2...a huge Thanks

A huge Thanks needs to go to the guys at Eternal Ink for the running-in of all these Machines.
They are Justin, Rochey & Gary.

With a number of Orders having both Liners & Magnums, it's allowed the guys the option of using a big Tattoo to run-in 2 x Machines.
With the majority of these Jolly Machines now run-in, they're being posted off to their "new homes".


Friday 14 September 2012

Brett Stewart's Tattoo Museum

Back in April while attending the Rights of Passage Show, I managed to catch up with Brett Stewart who is well known for both his Tattoo Supply & Museum.

The Australian Museum section already has some of my very early built & modified Machines which were made for Beans in the late 80's.
With my return to Machine building again, Brett was most interested in obtaining some of my newer ones.


The Hugo Machines
Batch 1 Machines were named Hugo Machines, which saw the very first of that Batch, Machine #1, going off to Jimmy Whitlock's Luckys Tattoo Museum.
From that Batch, there was a grand total of 11 Machines built, the other 10 were documented on the Blog here.
The last numbered of those Hugo Machines was #11, known as the "Tester" with a set of Lucky Coils.

But what hasn't been documented until now, was that there were actually 13 Frames made in total...
Because I was a Jeweller & being that those Frames were all hand made, I played it safe & so made a couple of extras just in case there was a possibility of a "reject" Frame.
In fact there were two "rejects":
  • One had a slight twist within the Frame which was only detected in the final stages & whilst trying to straighten this Frame, a weld cracked making it a reject. This Frame was completed & is stamped.
  • One had a 1.5mm drill bit break whilst drilling a pilot hole, which couldn't be removed, thus making it a reject. Although this Frame never reached the point of completion, it has been stamped for Brett.

Although these two Frames aren't complete Machines, I'm guessing in some ways they could be of more importance to Brett's Australian Museum, as normally they'd just have been thrown out as scrap metal.


The Jolly Machines
Batch 2 Machines are the current design Frame & are named Jolly Machines.
This new style of Frame started out as a set of 4 x prototypes, with the very first of them being #12,
having followed on from the last numbered of the previous Hugo Machines.
I've decided to set up this #12 prototype Jolly Machine just like I'd have run it back in the 90's.
  • Thin Armature 
  • Rubber Block to hold a straight Needle Bar (no Eye Loop)
  • 3.5mm Audio Socket & Plug to suit as the Clip Cord connection (Aussie Old School)

In some of the photos, you'll see that I still needed to make up the Bracket for the 3.5 Audio Socket to be attached, but otherwise everything else was done.
And just like with any other of my Machines, this will also be getting tuned & run-in.

Then the two Hugo Frames & this #12 Jolly Machine will be going off to Brett's Australian Tattoo Museum.

The two reject Hugo Frames.
The lower one has the broken drill bit within the Spring Landing.

Here the broken drill bit can be clearly seen in the Spring Landing.
It can also be seen that I did try drilling it out.

Side by side view of both the reject Fames showing their Spring Landings. 

The #12 Jolly Machine awaiting it's Bracket.
Each of the Frames is individually engraved by me, here the engraved #12 can be clearly seen.
Thin Armature, Rubber Block & a straight Needle Bar.
Another view of the #12 Jolly Machine.

The now completed  #12 Jolly Machine.

The complete #12 Jolly Machine showing the Bracket & 3.5mm Audio Socket.


Sunday 9 September 2012

Crazy A.I.T.S. in Melbourne

There's a special Tattoo Show coming to Melbourne in early November called Crazy A.I.T.S.
Reading through all the available info, it's going to quite an event.
The days, dates & times are:

  • Friday       2nd November    2.00pm - 11.00pm
  • Saturday   3rd November    12 noon - 11.00pm
  • Sunday     4th November     12 noon - 7.00pm


So decided to treat Marie & myself to a couple of the VIP Passes.
We're looking forward to catching up with some old friends & the possibility of making some new ones too.


Machine Building2...tune & run-in

Lots been happening & although it's been awhile since posting anything, I haven't been idol.


Are we there yet..are we there yet..?
At present, all 12 of the Batch 2 Jolly Machines are fully assembled, having been Soldered & Shimmed just like all of those Hugo Machines from Batch 1.

Ten of those Jolly Machines have already been fine tuned & are now currently being run-in by the
guys at Eternal Ink in Berwick.  (Please note the Studio name change!)

What about the other two..?
Those remaining two Jolly Machines require the "Aussie Old School" 3.5mm Audio connection instead of
the current standard spring style of Clip Cord.
This kind of "speciality item" has been mention previously in an earlier Blog post here.

Being that the Jolly Frames are a totally new Frame, I'd not had the opportunity to make any Brackets for this particular option, which meant I couldn't finalise their assembly for the tuning & run-in.
The design for the Bracket is simple enough, so I'll be making up a number of them this week.


So for those of you with Orders for Batch 2...expect an email from me within the coming weeks.


Friday 27 July 2012

Machine Building2...components into sub-assemblies

Thursday's are now my day off, so here's what I've managed to get done...

Components into Sub-Assemblies:
As with anything mechanical, a Tattoo Machine contains various components that when coupled together, they'll form a sub-assembly...
...in this case these's two sets of sub-assemblies that will each form a Top & Bottom Binding Post.

On a standard DC Coil Machine, both of these Binding Posts are for the (+) Positive connection & so will have some form of Insulators to stop any short circuiting to the Frame which is the (-) Negative connection.
Top Binding Posts are obviously at the "top" of the Machine & contain the Contact Screw, which in my case are always made of Sterling Silver.
Bottom Binding Posts are typically positioned at the bottom of a Frame & is where the Clip Cord will go.

I like to have them all assembled & ready to go when I start the final assembly into a complete Machine.

And that same basic principle also applies to the Springs...
...Top Spring, Back Spring & the Armature when put together form another sub-assembly.
So here's a couple of photos showing the Spring sets being marked out & cut.


Lots of sub-assemblies...Frames, Binding Posts & Springs.

Top & Back Springs all cut, their holes punched & all sharp edges linished smooth.

Wednesday 25 July 2012

Machine Building2...black oxide finish


Here's a quick update on where the Frames are currently at...

Black Oxide:
With all of the Frames linished, reamed & stamped, it was now time for the Black Oxide treatment.
Being that it's a specialised process, I simply drop the Frames off & pick them up the next day.
They come back with their Black Oxide finish, but they're also covered with oil to minimise any rusting.
So obviously my next job is going to be a thorough cleaning & remove all traces of that oil from them.

Here's the Frames just back from getting their Black Oxide finish.


A closer view of the Frames.
Note that the surface texture is just a thick covering of oil over them.


Another close up view of the Frames with their Black Oxide finish.
Note that the surface texture is just a thick covering of oil over them.

Saturday 14 July 2012

Machine Building2...linish, ream, stamp

Linish:
Next on the agenda was to now linish all of the edges & surfaces of the Frames.
I'm using a special Scotchbrite Belt to remove all the various file marks & give the Frames a nice satin finish.

Frames laid out in preparation for their linishing.

Frames on the left & the Scothbrite Belt all set up & ready to go

Another view of that Scothbrite Belt used for linishing.

And so the linishing of the Frames begins. 

Closer view of the freshly linished Frames.


Ream:
After all of the linishing is completed, I then go through & individually hand ream all the Tube holes.
This helps to ensure that both 5/16" & 8mm Tubes (of good quality) will fit correctly into my Machines.

To ensure a nice fit for Tubes, each Frame is individually hand reamed.


Stamp:
I then go through & double check everything is square & aligned correctly.
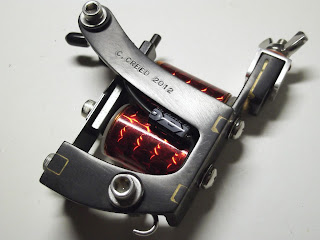
Once I'm sure that each Frame is OK, I then individually stamp them C.CREED 2012

Frame in position ready for it's stamping.

Apologies for slightly out of focus shot...but the stamp was good.

12 x Frames all completed & stamped.


Friday 6 July 2012

Machine Building2...file, drill, tap

File:
There were 6 x Frames left over that still needed to be cleaned up after being welded & brazed...
...so here's that process with accompanying photos.
Each of the Frames is individually filed as part of the clean up process.
In this photo, the last Frame is waiting to be filed.
A closer view of those Frames.

Drill:
This is part of that whole idea of "work smarter, not harder"
After the last of the 6 x Frames was finished being cleaned up, the next process is to set up for the drilling of the Quickchange.
Because all the Frames are now being laser cut, everything is identical & accurate, so all their holes are in exactly the same spot.
Knowing each Frame would correctly line up in the same position each time, meant I was able to design myself a Jig to hold the Frames, whilst drilling the hole for their Quickchange.

Next comes the drilling to give the Frames their Quickchange.
I've made things easier for myself by building a Jig to suit.
Another view of the Frame set up into the Jig for drilling the Quickchange.

Tap:
After all 12 of the Frames were drilled, the next process was to tap those holes to suit a threaded stud.
I'm using the exact same thread type as found on any standard American made Machines...
...that is 8-32 UNC
I've deliberately chosen 8-32 UNC in an effort to keep things uniform for anyone buying my Machines.
There's nothing more frustrating than reaching for the Allen Key that fits everything else & finding it wont..!


Each of those drilled holes needs to be tapped.


Friday 22 June 2012

Machine Building2...let the Frames begin!


I've been busily working on the current Orders (Batch 2) for the newly named "Jolly" Machines.
In Batch 2 there's a total of 12 x Machines to be made & they're now well under way.

At present all of these Frames have had their welding & brazing process done.
Then each of those brazed sections is hand filed to remove any excess braze, of which I've currently completed 6 x Frames.

My intention was to take photos of them during each phase of the construction, but unfortunately I've gotten caught up with the actual building, rather than stopping to take photos.
I'll try my best to remember to take more photos when doing the next process.

Here's some photos of how they're looking so far...

All the Frames for Batch 2 are well under way.

Closer view of those welded & brazed Frames.

Closer view of  those filed & cleaned up Frames.


Saturday 16 June 2012

Machine Building 2...what name for a Frame?

Although it's not critical, it'd be nice to come up with a better name for these new Frames than "new style"!

My original Machines were based on a Bulldog Frame & so I named them after my then recently departed & much loved Aussie Bulldog... "Hugo" ...a simple word association!
...of course this all makes perfect sense if you're Aussie or happen to understand our humour!


What's in the name of a Frame:
Given that these new Frames are my "pirated" version of a Paul Rogers "J" Frame, it follows that the best name for them would be "Jolly"...as in the Jolly Roger used by Pirates...
...again some word associations & a good dose of Aussie humour!!

So there you have it...from here on the new style Machines will be simply known as the "Jolly".

Side view of the "Jolly" Frame
Front view of the "Jolly" Machine


Tuesday 29 May 2012

Machine Building...comparing the "Testers"

I mentioned at the end of my last post...
"It'll be very interesting to directly compare just how close the two Machines fitted with Lucky Coils will run."

Well, I asked Justin from Eternal Ink to run some direct comparisons between both Machines...
...the Hugo Lucky Coil Tester & the new Lucky Coil Tester.

The two Thin Armature Machines that are fitted with Lucky Coils, sitting side by side.

Justin has run the Hugo Lucky Coil Tester for quite some time now & is really impressed with it...
Check out some of Justin's work using the "Hugo" Liner here & also here.
He's so impressed with this Thin Armature Machine that he hates having to give it back to me!

So what was the verdict from Justin of this new Lucky Coil Tester..?
..."It's pretty close, you can hardly tell any difference between them."

With that confirmation from Justin, I'll now move onto building all the new Orders using this Frame style.

The Hugo Lucky Coil Tester

The new Lucky Coil Tester


Monday 14 May 2012

Machine Building...new phase "Testers"

Lots been happening, so my apologies in advance for this being such a looong post.

Continuing with the new phase:
I've been working on those new smarter Fames so that I can get them up & running as a set of "Testers".
I figured that 4 x Frames should be enough to test & make sure that everything goes together & works well.

Choose any color, as long as it's Black:
I also decided to try out a new coating using these particular Frames...it's a Black Oxide finish.
This Black Oxide is a special treatment that only colors ferrous metals, in this case the steel Frames.
And all the welded seams show up as gold because I'm using Bronze, which is a non-ferrous metal.

The Testers will then go to Eternal Ink to be used daily & confirm that everything works as expected.
Once proven, this new style Frame will then replace those earlier "Hugo" Frames that I was making.
And all going well, this new Black Oxide will also replace that Clear coating used previously.

Here's a collection of photos showing the progression of these new Frames into Machines & into Testers.

Frames welded & now awaiting their Quickchanges
Frames fitted with Quickchanges & the new Black Oxide finish
Close up of Frame with Black Oxide finish & the Bronze weld seams
Next the assembly is started, Coils fitted & awaiting wiring


This Frame fitted with a set of Lucky Coils

Coils wired, Capacitors fitted & everything soldered


This Frame fitted with a set of Lucky Coils

Springs & Armatures for 3 x Frames
A special Tester, a Thin Armature Magnum...real Aussie Old School
This Tester, a Big Needle Liner
This Tester with the Lucky Coils, a Thin Armature Liner to directly compare against this one

There's still a bit of work to do on these Testers...one still needs a set of Springs made for it & then they'll each require some shimming & tuning.
It'll be very interesting to directly compare just how close the two Machines fitted with Lucky Coils will run.